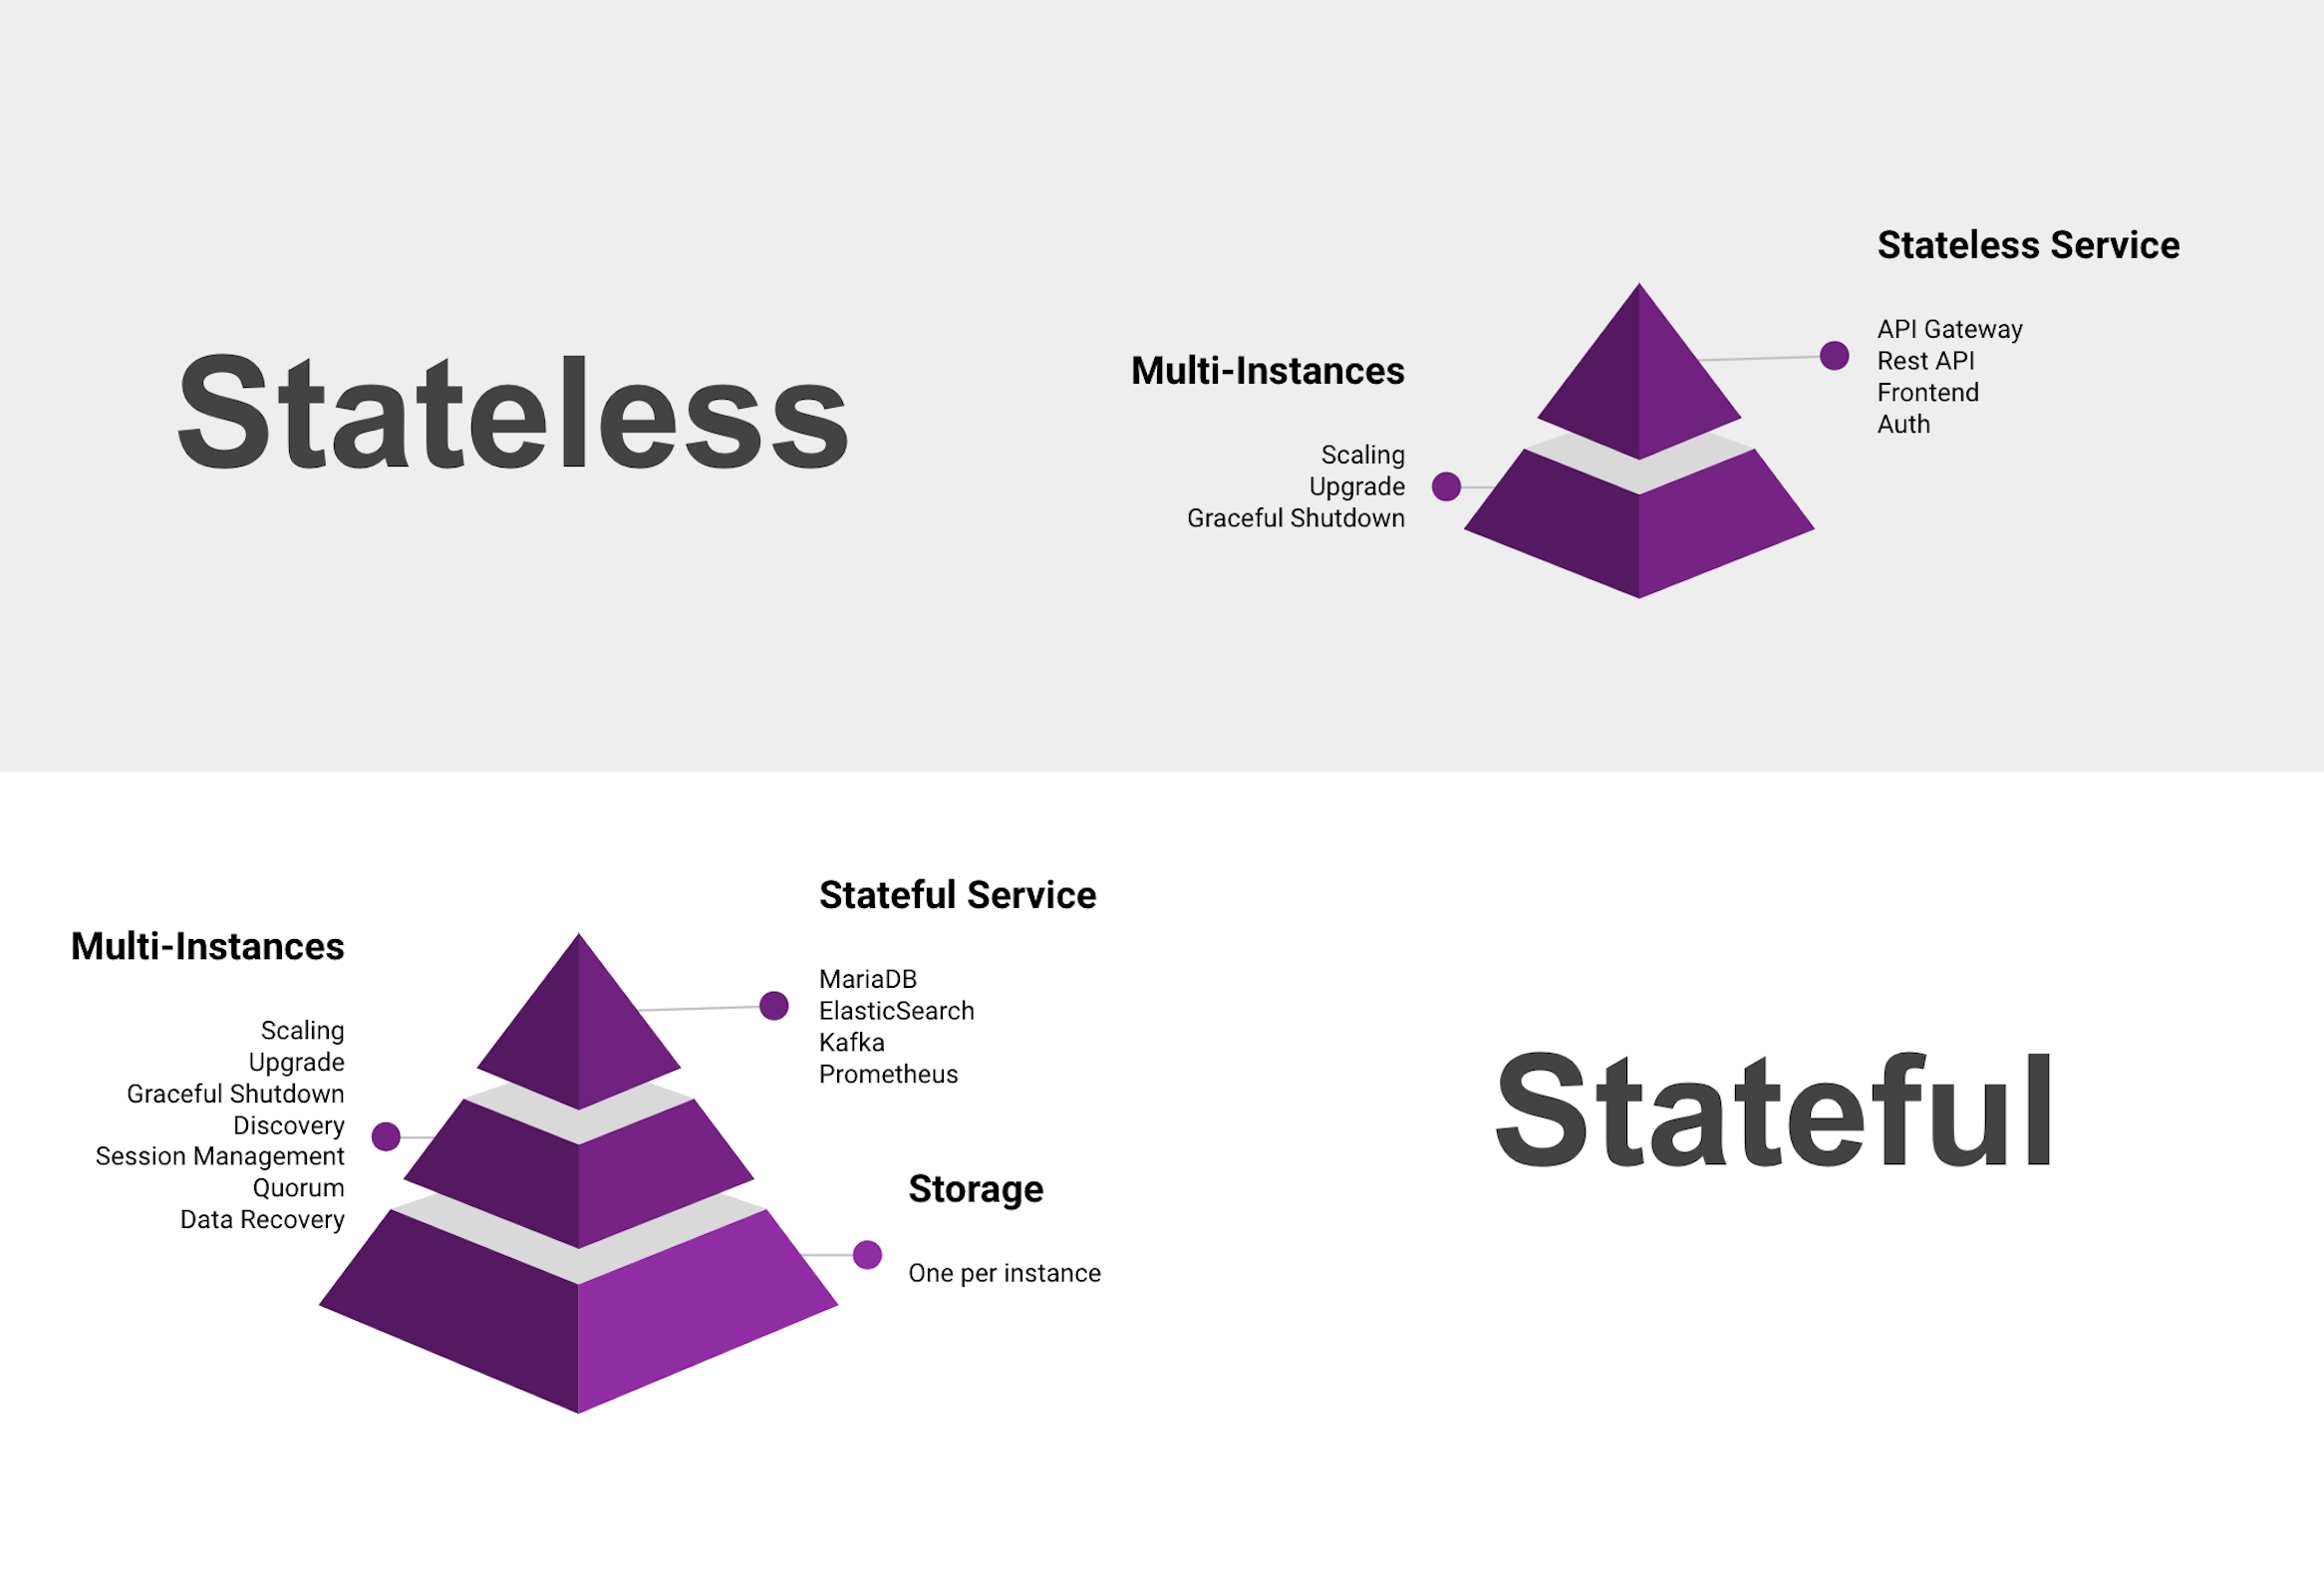
Stateless apps
A stateless app is an application program that does not save client data generated in one session for use in the next session with that client.
As an example a REST API backend service that performs requests on a database is stateless, though the database itself is stateful.

One of the main benefit of stateless apps is that their instances can be scaled on multiple replicas without issues. On the diagram above we can see that a deployment is scaled to two replicas, so it generates two pods. a service is connecting the active pods under a service IP that can be exposed internally or externally. If a pod dies, the deployment is responsible for generating a fresh identical replica of the pod, when that is active it will be attached to the service.
Start with Stateless
If you’re starting out your Kubernetes cluster and either migrating pre-existing instances or starting your new pet project, don’t start out with stateful solutions!
As a rule-of-thumb, give yourself at least 3 months of running stateless solutions on Kubernetes and then take on stateful solutions. Of course 3 months is arbitrary and depends myriads of other variables, but getting hands-on experience with stateless apps will give you a foothold so that you can work your way up the ladder with stateful apps.
So, if for example you’re starting out and running a cluster on GKE don’t try to fit your database and backend to kubernetes, instead use a managed db and run your stateless backend to kubernetes first. Once you get a feeling, then you can evaluate migrating stateful apps such as a db to the cluster.
Stateful apps
A stateful app is a program that saves client data from the activities of one session for use in the next session. The data that is saved is called the application’s state.
In order to get state we need a disk to store data. In kubernetes the disks are represented by PersistentVolumes (PV) and a claim of a disk with specific characteristics can be done with PersistentVolumeClaims (PVC). Normally during deploy of an app we create a PVC and a StorageClass will generate the PV and attach it to our PVC.
")
On the diagram above we can see a StatefulSet that generates a Pod which mounts a disk provided by the PVC/PV pair. If you run a single instance database server, that would fit the above example. But in case the instance goes down we will loose service, in order to get a stateful app in high-availability (HA) mode we need more than one instance.
There are different patterns to accomplish HA on stateful apps, we’ll use as example how etcd distributed key-value store works.
")
When running etcd on HA, all instances form an etcd cluster. each instance has its own local disk (PVC/PV pair). The etcd cluster decides in unison a leader using raft protocol, if the leader goes down the absolute majority will vote a new leader, thus the odd number of cluster nodes, in our example 3 instances. Each instance can receive read/write requests. the read requests are responded by the local data, while the write requests are forwarded to the leader which in turn broadcast the changes to the rest.
Deploying an etcd cluster
Now that we went over the theory let’s do an example by deploying an etcd cluster using StatefulSet inside Kubernetes.
Create Kubernetes Cluster
In case you already have a kubernetes cluster you can skip this.
We’ll use Google Cloud Platform to run our cluster as GKE. There is a free tier which you can use to run the example.
# create tutorial cluster
gcloud container clusters create tutorial --num-nodes 1

# get credentials of the cluster
gcloud container clusters get-credentials tutorial
Once the cluster is ready you should be able to test the connectivity:
❯ kubectl get nodes
NAME                                      STATUS   ROLES    AGE    VERSION
gke-tutorial-default-pool-ca31e247-bagb   Ready    <none>   2m2s   v1.16.15-gke.4901
Create StorageClass
Google Kubernetes Engine (GKE) by default is providing pd-standard disks with the default storageclass:
$ kubectl get storageclass -o=custom-columns=NAME:.metadata.name,TYPE:.parameters.type
NAME       TYPE
standard   pd-standard
Let’s create the ssd-storageclass.yaml:
kind: StorageClass
apiVersion: storage.k8s.io/v1
metadata:
  name: ssd
provisioner: kubernetes.io/gce-pd
parameters:
  type: pd-ssd
And apply it to the cluster:
❯ kubectl create -f ssd-storageclass.yaml
storageclass.storage.k8s.io/ssd created
Deploy etcd cluster
We can now deploy the etcd cluster, which will be a StatefulSet with 3 replicas and two Services, one for internal peer communication between the instances as headless service and another for accessing the cluster externally through the API.
apiVersion: v1
kind: Service
metadata:
  name: etcd-client
spec:
  type: LoadBalancer
  ports:
    - name: etcd-client
      port: 2379
      protocol: TCP
      targetPort: 2379
  selector:
    app: etcd
---
apiVersion: v1
kind: Service
metadata:
  name: etcd
spec:
  clusterIP: None
  ports:
    - port: 2379
      name: client
    - port: 2380
      name: peer
  selector:
    app: etcd
---
apiVersion: apps/v1
kind: StatefulSet
metadata:
  name: etcd
  labels:
    app: etcd
spec:
  serviceName: etcd
  selector:
    matchLabels:
      app: etcd
  replicas: 3
  template:
    metadata:
      name: etcd
      labels:
        app: etcd
    spec:
      containers:
        - name: etcd
          image: quay.io/coreos/etcd:latest
          ports:
            - containerPort: 2379
              name: client
            - containerPort: 2380
              name: peer
          volumeMounts:
            - name: data
              mountPath: /var/run/etcd
          command:
            - /bin/sh
            - -c
            - |
              PEERS="etcd-0=http://etcd-0.etcd:2380,etcd-1=http://etcd-1.etcd:2380,etcd-2=http://etcd-2.etcd:2380"
              exec etcd --name ${HOSTNAME} \
                --listen-peer-urls http://0.0.0.0:2380 \
                --listen-client-urls http://0.0.0.0:2379 \
                --advertise-client-urls http://${HOSTNAME}.etcd:2379 \
                --initial-advertise-peer-urls http://${HOSTNAME}:2380 \
                --initial-cluster-token etcd-cluster-1 \
                --initial-cluster ${PEERS} \
                --initial-cluster-state new \
                --data-dir /var/run/etcd/default.etcd
  volumeClaimTemplates:
    - metadata:
        name: data
      spec:
        storageClassName: ssd
        accessModes: ["ReadWriteOnce"]
        resources:
          requests:
            storage: 1Gi
Let’s apply it on the cluster:
❯ kubectl create -f etcd-statefulset.yaml
service/etcd-client created
service/etcd created
statefulset.apps/etcd created
You should now have an etcd cluster running:
❯ kubectl get pod
NAME     READY   STATUS    RESTARTS   AGE
etcd-0   1/1     Running   0          49s
etcd-1   1/1     Running   0          38s
etcd-2   1/1     Running   0          18s
To verify that the cluster is connected properly run:
❯ kubectl exec -it etcd-0 -- etcdctl cluster-health
member 2e80f96756a54ca9 is healthy: got healthy result from http://etcd-0.etcd:2379
member 7fd61f3f79d97779 is healthy: got healthy result from http://etcd-1.etcd:2379
member b429c86e3cd4e077 is healthy: got healthy result from http://etcd-2.etcd:2379
cluster is healthy
Interacting with etcd
Now that etcd cluster is setup we can use it either with REST API or with the etcdctl CLI. First let’s check the external connectivity with REST API:
❯ kubectl get svc
NAME          TYPE           CLUSTER-IP   EXTERNAL-IP     PORT(S)             AGE
etcd          ClusterIP      None         <none>          2379/TCP,2380/TCP   11m
etcd-client   LoadBalancer   10.62.3.17   34.76.137.212   2379:30917/TCP      11m
Use the external IP of etcd-client to send a request to store msg=hello-world.
# set msg
❯ curl http://34.76.137.212:2379/v2/keys/msg -XPUT -d value=hello-world
{"action":"set","node":{"key":"/msg","value":"hello-
world","modifiedIndex":21,"createdIndex":21}}
# get msg
❯ curl http://34.76.137.212:2379/v2/keys/msg
{"action":"get","node":{"key":"/msg","value":"hello-world","modifiedIndex":21,"createdIndex":21}}
Since the requests are passing through the service etcd-client they are balanced between all instances.
If we want to test each of the instances separately we can do the same request from inside the cluster with the internal service:
# get msg from inside the cluster with REST API (etcd-0.etcd)
❯ kubectl exec -it etcd-0 -- wget -qO- http://etcd-0.etcd:2379/v2/keys/msg
{"action":"get","node":{"key":"/msg","value":"hello-world","modifiedIndex":21,"createdIndex":21}}

# get msg from inside the cluster with REST API (etcd-1.etcd)
❯ kubectl exec -it etcd-0 -- wget -qO- http://etcd-1.etcd:2379/v2/keys/msg
{"action":"get","node":{"key":"/msg","value":"hello-world","modifiedIndex":21,"createdIndex":21}}

# get msg from inside the cluster with REST API (etcd-2.etcd)
❯ kubectl exec -it etcd-0 -- wget -qO- http://etcd-2.etcd:2379/v2/keys/msg
{"action":"get","node":{"key":"/msg","value":"hello-world","modifiedIndex":21,"createdIndex":21}}
This works because of the headless service etcd. The DNS entries etcd-0.etcd, etcd-1.etcd, etcd-2.etcd resolve to the respective pod IPs. This is useful so that discovery between peers can happen easily.
Lastly, we can use etcdctl to check the value on each instance locally:
❯ kubectl exec -it etcd-0 -- etcdctl get msg
hello-world

❯ kubectl exec -it etcd-1 -- etcdctl get msg
hello-world

❯ kubectl exec -it etcd-2 -- etcdctl get msg
hello-world
Testing High Availability
To test that the etcd cluster works on high availability, let’s kill the leader of the cluster and see how the re-election works.
First let’s find out who is the leader:
❯ kubectl exec -it etcd-0 -- etcdctl member list
2e80f96756a54ca9: name=etcd-0 peerURLs=http://etcd-0.etcd:2380 clientURLs=http://etcd-0.etcd:2379 isLeader=true
7fd61f3f79d97779: name=etcd-1 peerURLs=http://etcd-1.etcd:2380 clientURLs=http://etcd-1.etcd:2379 isLeader=false
b429c86e3cd4e077: name=etcd-2 peerURLs=http://etcd-2.etcd:2380 clientURLs=http://etcd-2.etcd:2379 isLeader=false
Now let’s kill the leader and do some tests:
# kill the leader
❯ kubectl delete pod etcd-0
pod "etcd-0" deleted

# check cluster health
❯ kubectl exec -it etcd-1 -- etcdctl cluster-health
failed to check the health of member 2e80f96756a54ca9 on http://etcd-0.etcd:2379: Get http://etcd-0.etcd:2379/health: dial tcp 10.64.2.64:2379: i/o timeout
member 2e80f96756a54ca9 is unreachable: [http://etcd-0.etcd:2379] are all unreachable
member 7fd61f3f79d97779 is healthy: got healthy result from http://etcd-1.etcd:2379
member b429c86e3cd4e077 is healthy: got healthy result from http://etcd-2.etcd:2379
cluster is degraded
command terminated with exit code 5

# check service is still working (read)
❯ curl http://34.76.137.212:2379/v2/keys/msg
{"action":"get","node":{"key":"/msg","value":"hello-world","modifiedIndex":21,"createdIndex":21}}

# check service is still working (write)
❯ curl http://34.76.137.212:2379/v2/keys/msg -XPUT -d value=hello-again
{"action":"set","node":{"key":"/msg","value":"hello-again","modifiedIndex":33,"createdIndex":33},"prevNode":{"key":"/msg","value":"hello-world","modifiedIndex":31,"createdIndex":31}}

# check cluster is healthy after a while
❯ kubectl exec -it etcd-1 -- etcdctl cluster-health
member 2e80f96756a54ca9 is healthy: got healthy result from http://etcd-0.etcd:2379
member 7fd61f3f79d97779 is healthy: got healthy result from http://etcd-1.etcd:2379
member b429c86e3cd4e077 is healthy: got healthy result from http://etcd-2.etcd:2379
cluster is healthy

# check the leader has changed
❯ kubectl exec -it etcd-1 -- etcdctl member list
2e80f96756a54ca9: name=etcd-0 peerURLs=http://etcd-0.etcd:2380 clientURLs=http://etcd-0.etcd:2379 isLeader=false
7fd61f3f79d97779: name=etcd-1 peerURLs=http://etcd-1.etcd:2380 clientURLs=http://etcd-1.etcd:2379 isLeader=false
b429c86e3cd4e077: name=etcd-2 peerURLs=http://etcd-2.etcd:2380 clientURLs=http://etcd-2.etcd:2379 isLeader=true
Conclusion
Making a Stateful app to work in Kubernetes is not difficult, but making it work so that it is resilient and in high-availability mode depends on the architecture of the app itself, etcd is a battle-tested example in Kubernetes, but other solutions such as relational databases are a bit more complicated.
Hopefully this post has helped in providing some perspective on the different aspects that are important on setting up stateful apps.